Are you tired of looking at the same old boring rocks in your garden?
Why not add some life to them by growing moss?

Moss is a low-maintenance plant that can add a touch of greenery and texture to any landscape. In this article, you’ll learn how to grow moss on rocks and transform your garden into a lush oasis.
To successfully grow moss on rocks, you’ll need to create the right conditions. Moss thrives in moist and shady environments, so choose a spot in your garden that gets little to no direct sunlight.

You’ll also need to choose the right type of rock. Porous rocks like sandstone and limestone are ideal for moss growth because they retain moisture and provide a good surface for the moss to attach to.
Once you have the right conditions and rock, it’s time to start growing moss. You can use a few methods, including direct transplantation on the rock and gathering moss from nearby areas.
We’ll cover all of these methods in detail so you can choose the one that’s right for you. So, get ready to add some green to your garden and learn how to grow moss on rocks.
Key Takeaways
- Moss is a low-maintenance plant that can add a touch of greenery and texture to any landscape.
- To grow moss on rocks, you need to create the right conditions and choose the right type of rock.
- Several methods for growing moss on rocks include direct transplantation and gathering moss from nearby areas.
- There are types of moss that are more suitable than others for growing on rocks
Conditions for Growing Moss on Rocks
Congratulations, you’ve decided to grow moss on rocks! You’re now officially part of the cool moss-growing club. But before you start, let’s go over the conditions that are necessary for growing moss on rocks.
First things first, moss loves shade. So, find a spot that gets minimal direct sunlight. If you want to grow moss on a vertical surface, such as a fence or brick wall, make sure it’s on the north side.
Next, moss needs moisture. Keep the area moist but not too wet. You don’t want to drown your moss babies. Use a hose or watering can to water the area regularly.
When it comes to soil, moss could be more picky. It can grow on various surfaces, including hard surfaces like concrete and bricks. However, the soil should be acidic, with a pH of around 5.5 to 6.5. You can use pH test strips to check the soil’s acidity level.
Moss also needs a healthy root system. To ensure this, make sure the area has good drainage. If the area is too wet, the moss will rot and die.
Once your moss is established, it requires minimal maintenance. You don’t need to fertilize it, and you don’t need to weed it. In fact, weeds can be beneficial as they provide shade and hold moisture.
If you want to transplant moss from one area to another, make sure you do it in the fall or early spring. This is when the moss is most active and will have an easier time establishing itself in a new location.
Finally, there are various species of moss, each with its own texture and color. Some popular species for landscaping include sheet moss and sagina subulata.
So, there you have it – the conditions for growing moss faster on rocks. Now go out there and cultivate that moss! And if all else fails, try making a moss smoothie. Just kidding, don’t do that.
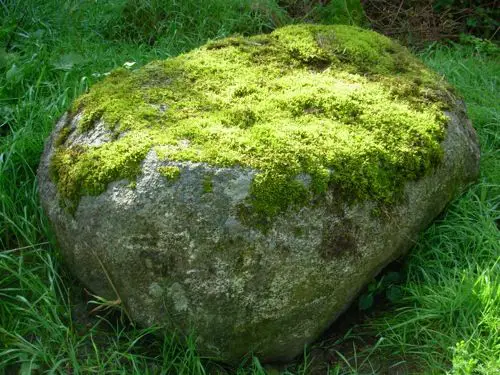
Choosing Suitable Rock for Growing Moss

You want to grow some moss on your rocks, huh? Well, you’re in luck because moss is easy to grow and can add a beautiful touch to any garden or landscape. But before you start, you must choose the right rocks to grow your moss.
Stick to stones, stone, or limestone. They are perfect for moss to grow on and won’t hurt your moss’s delicate feelings.
Now, let’s talk about the size of your rocks. You want to choose large rocks to provide a stable surface for your moss to grow on. But don’t go too big, or your moss won’t be able to spread as easily. Aim for rocks that are about the size of your head. That way, you can easily move them around if you need to.
When you’re choosing your rocks, keep in mind the location where you want to grow your moss. If it’s in a shady spot, choose rocks that are a bit rougher and have more crevices. This will give your moss more surface area to cling to. If it’s in a sunny spot, go for smoother rocks. They will reflect more light and help keep your moss from drying out.
In summary, to choose the best rocks for growing moss, stick to stones, stone, or limestone. Aim for rocks that are about the size of your head, and choose rougher rocks for shady spots and smoother rocks for sunny spots. And remember, don’t upset your moss’s delicate feelings by using hard surfaces like wood, bricks, or concrete.
Growing Moss on Rocks
So, you want to grow moss on rocks? Well, you’re in luck because it’s easier than you think. Here are a few tips to get you started:
Step 1: Find Some Rocks
First things first, you need some rocks. Look around your yard, neighborhood, or local park for porous rocks with some texture. Smooth, shiny rocks won’t work as well since moss needs something to attach to.
Step 2: Get Some Moss
Now that you have some rocks, it’s time to get some moss. You can either buy live moss or make a moss milkshake. Yes, you read that right – a moss milkshake. It’s not a drink but rather a mixture of moss and buttermilk that you can spread onto your rocks.
Step 3: Cultivate and Propagate
Once you have your moss, it’s time to cultivate and propagate. Spread your moss onto your rocks, making sure to press it down firmly. You can also use a sprinkler to keep the moss moist but don’t overwater it.
Step 4: Be Patient
Growing moss on rocks takes time, so be patient. It can take several weeks or even months for your moss to take hold and start spreading fully. But once it does, you’ll have a beautiful, natural addition to your yard or garden.
So there you have it – a quick and easy guide to growing moss on rocks. Just remember to find some rocks, get some moss, cultivate and propagate, and be patient. Happy moss growing!
Direct Transplantation on the Rock
If you want to grow moss on a rock, you can directly transplant it onto the rock. This method is easy and straightforward. Here’s how you can do it:
Applying Smashed Moss on Rocks
First, you need to collect some live moss. You can find it in your garden, nursery, or in the wild. Then, it would be best if you smashed the moss with a paintbrush or a rag to create a slurry. You can also use a blender to make a moss smoothie, but make sure to do just what is necessary. You want to avoid ending up with a green mess.
Once you have the slurry or smoothie, apply it on the rock using a paintbrush or your hands. Make sure to cover the entire surface of the rock with a consistent layer of moss. You can also add some plain yogurt or compost to the slurry to provide extra nutrients for the moss.
Placing the Rock in the Wild
After applying the moss, place the rock in a shady area with good drainage. You can also place it near trees or other plants to provide some extra moisture. Make sure to mist the moss regularly to keep it moist. You can also use a sprinkler to water it, but make sure not to overwater it. Moss doesn’t like to sit in water.
In a few weeks, you should start to see some growth on the rock. The moss will start to develop filaments and rhizoids, which will anchor it to the rock. You can also propagate the moss by cutting it into small pieces and transplanting it onto other rocks or surfaces.
Remember to care for your moss by keeping it moist and providing it with nutrients. You can also test the soil pH to make sure it’s suitable for the species of moss you’re growing. If the pH is too high, you can add some sulfur or mulch to lower it. You can add some limestone to raise it if it’s too low.
Growing moss on rocks is a fun and easy way to add some texture and color to your landscaping. Give it a try and see how nature can transform your yard or garden!
Gathering Moss
So, you want to grow moss on rocks? Well, you’re in luck because moss is one of the easiest plants to cultivate. First, you need to gather some moss. You can find it growing on rocks, trees, and even on the ground. Just ensure to avoid moss growing on weeds or rags because they may carry diseases or pests.
To gather moss, you can use a paintbrush or your hands. Make sure to moisten the moss with a mist of water before picking it up. You can also use a hose to gently rinse the moss off the rocks. If the moss is dry, it will be brittle and difficult to transplant.
When gathering moss, try to get a variety of species. There are two main types of moss: acrocarpous and pleurocarpous. Acrocarpous moss grows in a clump, while pleurocarpous moss spreads out like a carpet. Mixing these two types will give your rock garden a more textured look.
Once you have gathered your moss, it’s time to transplant it. Make sure the rock or stone you choose has good drainage and is in a shady area. Moss does not like direct sunlight, so make sure to place it in a spot where it will be protected.
To transplant the moss, create a slurry by blending the moss with plain yogurt or a moss milkshake. Spread the slurry over the rock or stone and mist it with water. You can also sprinkle chopped moss over the slurry to add more texture.
After transplanting the moss, make sure to water it regularly and keep it moist. Moss does not have a root system, so it relies on moisture and nutrients from the air. You can fertilize the moss with a mixture of compost and mulch or use a moss-specific fertilizer.
In conclusion, gathering moss is easy and fun. Just make sure to choose a variety of species, transplant it properly, and care for it regularly. You can have a beautiful and healthy moss garden with a little maintenance. Happy planting!